Why do we turn off our PC / Laptop Hard Disk?, this aims to save electricity or battery consumption.
For you Windows 10 users, you can take advantage of the settings in Power Options to turn off the hard disk when there is no activity for a certain period of time.
This option is known as Turn Off Hard Disk after is a part of the power management choices of the current power plan. The user can control it, turn on or turn off it. It depends on the required power plan, it can be turned on or turn off out of the box. For instance, it is turned on in the Balanced and Power Saver power profiles, and turned off in the Performance power plan. So, do you need this feature?
Here are 5 easy steps to turn off the Hard Disk Drive when Idle in Windows 10
1. Open Windows Run (Win Key + R key), then type powercfg.cpl
 |
| Open Windows Run (Win Key + R key) |
 |
| Open Windows Run (Win Key + R key), then type powercfg.cpl |
2. Click the Change plan settings option, adjust to the power plan that will be used
 |
| Click the Change plan settings option, adjust to the power plan that will be used |
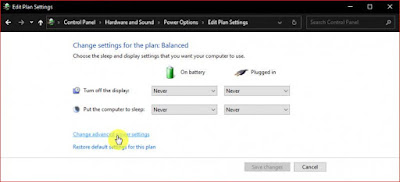
3. Click on the option Change advanced power settings
 |
| Click on the option Change advanced power settings |
4. Open the Hard disk menu, then you will find settings to set how long the hard disk will turn off after a few minutes without read / write (idle) activity. You can set when the device is connected (Plugged in) or not connected to an electric current (On battery). Click OK to save the settings
 |
| settings to set how long the hard disk will turn off |
5. Done
When the activity on the hard disk drive stops, there will be a delay of several seconds before the disk rotation on the hard disk drive will move again. However, you should also note that this feature will not work on Solid State Drives (SSD) or Non-Volatile Memory Express (NVMe).
That's an easy way to turn off the Hard Disk Drive when Idle in Windows 10. Hopefully this simple information can help you.


.jpg)
.jpg)
